Kitchen Container For Food Scraps
The Essential Kitchen Container: A Cornerstone for Sustainable Gardening
In the journey towards a more sustainable home and a thriving garden, the humble kitchen food scrap container often goes overlooked. Yet, this simple receptacle plays a pivotal role, serving as the initial collection point for organic materials destined to enrich our soil and reduce landfill waste. Far from being merely a bin, it acts as a critical interface between daily culinary activities and the ecological cycles that underpin healthy plant life. Managing food scraps effectively at the kitchen level is not just about convenience; it is about embracing a responsible approach to resource management, transforming potential waste into valuable garden amendments. This article delves into the world of kitchen food scrap containers, exploring their types, selection criteria, best usage practices, and their profound impact on fostering a vibrant, productive garden while minimizing our environmental footprint.
The relevance of this kitchen tool extends beyond mere waste diversion. For gardeners, it represents a direct pathway to creating nutrient-rich compost, the lifeblood of organic cultivation. By segregating food scraps at the source, households contribute to a circular economy where organic matter is returned to the earth, improving soil structure, enhancing water retention, and providing essential macro and micronutrients for plants. This proactive approach significantly reduces the need for synthetic fertilizers and promotes a more resilient garden ecosystem. Understanding the nuances of choosing and utilizing the right kitchen container is the first, crucial step in unlocking these extensive benefits, transforming a mundane kitchen chore into a meaningful act of environmental stewardship and horticultural excellence.
The Environmental and Horticultural Imperative of Food Scrap Diversion
Globally, food waste constitutes a significant portion of municipal solid waste, contributing substantially to greenhouse gas emissions when it decomposes in landfills without oxygen. In anaerobic conditions, organic matter produces methane, a potent greenhouse gas far more impactful than carbon dioxide over a short period. By diverting food scraps from landfills, we directly mitigate these emissions, making a tangible difference in the fight against climate change. Furthermore, the energy and resources expended in producing, processing, and transporting food are effectively wasted when that food ends up in a landfill, exacerbating the environmental burden.
From a horticultural perspective, food scraps are gold. They are packed with essential nutrients like nitrogen, phosphorus, and potassium, as well as vital trace elements that plants need to flourish. When properly composted, these scraps break down into humus, a dark, rich, and stable organic material that dramatically improves soil health. Humus enhances soil structure, creating a crumbly texture that allows for better root penetration and aeration. It acts like a sponge, increasing the soil’s water-holding capacity, which is particularly beneficial in drought-prone areas or for reducing irrigation needs. Moreover, compost supports a diverse community of beneficial microorganisms, fungi, and invertebrates, which are crucial for nutrient cycling, disease suppression, and overall soil vitality. Thus, a well-managed flow of food scraps from kitchen to garden is not just about waste reduction; it is about cultivating healthier soil, more robust plants, and a more sustainable gardening practice.
Understanding Food Scraps: What Belongs and What Doesn’t
The success of any food scrap collection system, particularly one geared towards gardening and composting, hinges on a clear understanding of what materials are suitable for collection and what should be avoided. Not all organic matter is created equal when it comes to composting, and introducing inappropriate items can lead to odors, pests, slow decomposition, or even harm to plants. Establishing a stringent segregation practice at the kitchen level is paramount to maintaining a clean container and ensuring the quality of the subsequent compost.
Acceptable Materials for Garden-Bound Food Scraps
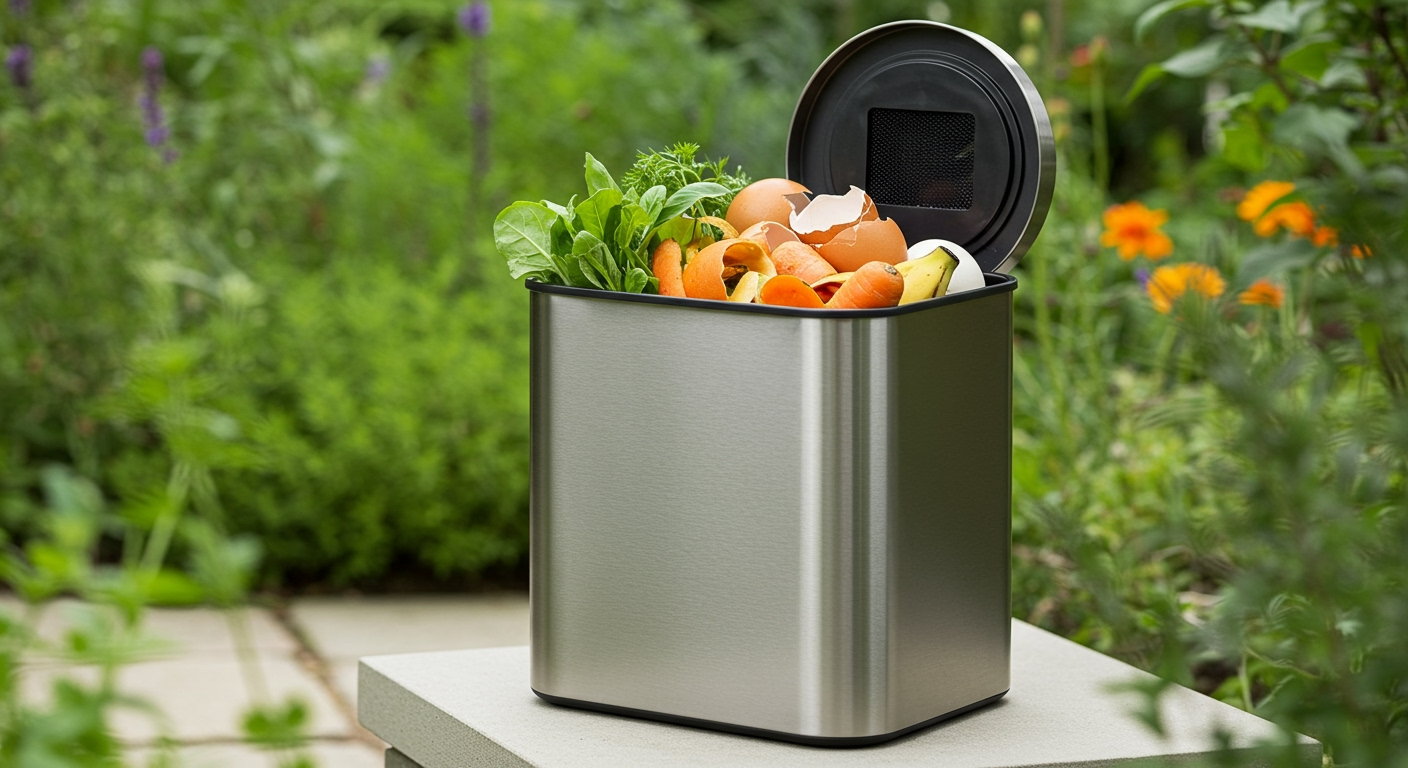
- Fruit and Vegetable Scraps: This category forms the bulk of suitable kitchen scraps. It includes peels, cores, seeds (non-invasive ones), trimmings, and spoiled or bruised produce. Examples are apple cores, banana peels, carrot tops, potato skins, lettuce leaves, and citrus rinds. These items are rich in moisture and various nutrients.
- Coffee Grounds and Filters: Spent coffee grounds are an excellent source of nitrogen and can help balance the carbon-rich “brown” materials in a compost pile. Paper coffee filters are also compostable.
- Tea Bags: Most tea bags, especially those made from paper or natural fibers, are compostable. It’s advisable to remove any staples or synthetic tags if present, though many modern tea bags are staple-free and fully biodegradable.
- Eggshells: Crushed eggshells add valuable calcium to compost and garden soil, which is essential for plant cell wall development and preventing issues like blossom end rot. Crushing them helps them break down faster.
- Plain Bread and Pasta: Small quantities of plain, stale bread, pasta, or rice (cooked or uncooked, without oils or sauces) can be added. These should be introduced sparingly to avoid attracting pests.
- Nut Shells (Untreated): Shells from nuts like peanuts, almonds, walnuts, and pecans can be composted, though they break down slowly. Avoid shells that have been salted or roasted with excessive oils.
Materials to Avoid in Kitchen Scrap Containers
Certain items, while organic, are generally not recommended for kitchen collection intended for home composting due to various reasons:
- Meat, Fish, and Bones: These materials decompose slowly, can produce strong, unpleasant odors, and attract pests such as rodents and flies. They also have the potential to harbor harmful pathogens.
- Dairy Products: Milk, cheese, yogurt, and other dairy items can also create strong odors and attract pests. Like meat, they break down slowly and can cause anaerobic conditions.
- Oils, Fats, and Greases: Cooking oils, butter, and greasy foods can become rancid, create odor issues, and impede the composting process by coating other materials and reducing air circulation. They can also attract pests.
- Diseased or Pest-Infested Plants: To prevent the spread of plant diseases and pests to your garden, avoid composting any plant material that shows signs of illness or infestation.
- Human or Pet Waste: These contain pathogens that can be harmful to humans and should never be added to a garden compost pile.
- Chemically Treated Materials: Any food scraps or related packaging that have come into contact with strong chemicals (e.g., pesticides) should be avoided to prevent contamination of your compost.
- Non-Biodegradable Items: Plastics, foils, synthetic sponges, and other non-organic materials must never enter the food scrap container. While some “compostable” plastics exist, they often require specific industrial composting conditions not typically met in home piles.
By adhering to these guidelines, households can ensure their kitchen food scrap container remains a clean, effective tool, contributing to a healthy composting system and a thriving, chemical-free garden.
Types of Kitchen Food Scrap Containers: Choosing the Right Fit
The market offers a diverse array of kitchen food scrap containers, each designed with different capacities, aesthetics, and features to suit varying household needs and kitchen layouts. Selecting the appropriate container is crucial for ease of use, odor management, and seamless integration into daily routines. The choice often depends on factors such as kitchen size, the volume of scraps generated, frequency of emptying, and personal preference for material and design.
Countertop Composting Bins
Countertop bins are perhaps the most common and convenient type of kitchen food scrap container. Their compact size allows them to sit directly on the kitchen counter, making it easy to deposit scraps during meal preparation or after eating. They typically range from 0.8 to 1.5 gallons (3 to 6 liters) in capacity, suitable for daily or every-other-day emptying.
- Stainless Steel: A popular choice due to its durability, ease of cleaning, and sleek appearance. Stainless steel bins are non-porous, resist odors, and often come with a charcoal filter in the lid to absorb smells. They are generally dishwasher safe.
- Ceramic: Offering an aesthetic appeal, ceramic bins can blend seamlessly with kitchen decor. They are heavy and stable, preventing accidental tipping. Like stainless steel, they are non-porous and easy to clean. Many ceramic bins also incorporate charcoal filters or ventilation holes.
- Plastic: Lightweight and often the most economical option, plastic bins come in various colors and designs. While convenient, some plastics can absorb odors over time, requiring more diligent cleaning. Look for BPA-free, durable plastics. Some plastic bins feature internal screens or aeration systems.
- Bamboo Fiber/Compostable Materials: Emerging as eco-friendly alternatives, these bins are made from sustainable materials. They offer a natural look and are often biodegradable themselves at the end of their lifecycle. Their durability and odor resistance vary by brand and specific material composition.
Under-Sink or Cabinet Bins
For those who prefer a less visible solution or require a larger capacity, under-sink or cabinet-mounted bins are an excellent option. These can range from 2 to 5 gallons (7 to 19 liters) or more, accommodating larger families or less frequent emptying schedules.
- Integrated Pull-Out Systems: Many kitchen cabinet manufacturers offer integrated waste management systems that include dedicated bins for food scraps. These typically feature full-extension glides for easy access and can be very space-efficient.
- Freestanding Bins: Simple, lidded bins can be placed inside an under-sink cabinet. While less elegant than pull-out systems, they serve the purpose of keeping scraps out of sight. Material options are similar to countertop bins, with plastic being prevalent due to its cost-effectiveness and weight.
Freezer or Refrigerator Storage
A highly effective method for preventing odors and slowing decomposition, especially for longer storage periods or in warmer climates, is to store food scraps in the freezer or refrigerator. This method is particularly useful for households that generate small amounts of scraps or only empty their main compost bin weekly.
- Dedicated Container: A simple plastic container with a tight-fitting lid, a repurposed ice cream tub, or a sturdy freezer bag can be used. Freezing the scraps stops decomposition, eliminating odors and preventing fruit flies.
- Benefits: Excellent odor control, no need for filters, allows for less frequent trips to the outdoor compost pile. This method is also beneficial for preventing mold growth on scraps before they are added to the compost.
Specialized Kitchen Systems
While not strictly “containers” in the traditional sense, some kitchen systems offer preliminary processing of food scraps before they go to a garden or compost pile.
- Bokashi Bins: This anaerobic fermentation system uses inoculated bran (with effective microorganisms, EM) to “pickle” food scraps, including items like meat and dairy that are typically avoided in traditional composting. The process significantly reduces odors and converts scraps into a fermented material that rapidly breaks down in soil or a compost pile. It also produces a nutrient-rich “tea” that can be diluted and used as a liquid fertilizer.
- Indoor Worm Composting Bins (Vermicomposters): Smaller, multi-tiered worm bins can be kept indoors, often in a laundry room or basement, and even sometimes in a corner of a kitchen. These systems use specific types of worms (e.g., red wigglers) to break down food scraps into nutrient-rich vermicompost and worm tea. While they require more active management than a simple container, they offer a direct path from kitchen to nutrient production.
Each type of container offers distinct advantages. The optimal choice depends on balancing practical considerations like capacity and odor control with personal preferences for aesthetics and environmental impact. A thoughtful selection ensures that the first step in food scrap diversion is both convenient and effective, setting the stage for successful composting and a healthier garden.
Key Features to Consider When Selecting a Container
Choosing the ideal kitchen food scrap container involves more than just picking the first one you see. A well-considered purchase ensures that the container integrates seamlessly into your kitchen routine, manages odors effectively, and remains hygienic with minimal effort. Evaluating several key features will help you find a container that meets your specific needs and supports your composting goals.
Size and Capacity
The appropriate size depends primarily on your household’s cooking habits and the frequency with which you intend to empty the container.
- Small (0.8-1.5 gallons/3-6 liters): Ideal for single-person households, those who cook infrequently, or individuals who prefer to empty their scraps daily. Prevents odors by ensuring frequent turnover.
- Medium (1.5-3 gallons/6-11 liters): Suitable for average-sized families (2-4 people) who cook regularly and empty their container every 2-3 days.
- Large (3+ gallons/11+ liters): Best for large families, avid cooks, or those who only empty their scraps once or twice a week. These are often better suited for under-sink or pantry storage to avoid dominating countertop space.
Consider the balance between holding enough scraps and not letting them sit so long that they start to decompose and produce odors.
Material
The material of the container affects its durability, aesthetics, ease of cleaning, and odor retention.
- Stainless Steel: Highly durable, rust-resistant, non-porous (excellent for odor resistance), and easy to clean. Often has a modern, sleek appearance. Can be more expensive.
- Ceramic: Visually appealing, often available in various colors and designs to match kitchen decor. Heavy and stable. Non-porous and easy to clean, but can be fragile if dropped.
- Plastic (BPA-free): Lightweight, often the most affordable, and available in numerous shapes and colors. Can be prone to scratching and might absorb odors over time if not cleaned diligently. Look for sturdy, food-grade plastics.
- Bamboo Fiber/Compostable Materials: Eco-friendly option, offering a natural look. Durability and odor resistance can vary. Some may not be as robust or easy to clean as stainless steel or ceramic.
Odor Control Mechanisms
One of the most critical aspects of a kitchen food scrap container is its ability to manage odors. Unpleasant smells are the primary reason people abandon their food scrap collection efforts.
- Tight-Fitting Lids: A fundamental feature. A lid with a silicone gasket or a strong seal is essential to trap odors inside.
- Charcoal Filters: Many countertop bins incorporate a compartment in the lid for activated charcoal filters. These filters absorb odors, significantly extending the time before smells become noticeable. Filters typically need to be replaced every 2-6 months, depending on use.
- Ventilation Holes: Some bins are designed with small ventilation holes (often located discreetly) to allow for minimal airflow, which can help prevent anaerobic decomposition (and associated foul odors) while still largely containing smells.
Ease of Cleaning
Regular cleaning is vital for hygiene and odor prevention. The easier a container is to clean, the more likely you are to maintain it properly.
- Smooth, Non-Porous Surfaces: Materials like stainless steel and ceramic have smooth surfaces that are easy to wipe down and less likely to harbor bacteria or absorb odors.
- Dishwasher Safe: Check if the container (or at least its inner liner, if applicable) is safe for dishwasher cleaning, which offers thorough sanitization with minimal effort.
- Removable Inner Buckets: Some larger bins feature a removable inner bucket, which makes emptying and cleaning much more convenient without having to move the entire container.
Aesthetics and Placement
Since the container will be visible in your kitchen, its appearance can be a factor.
- Kitchen Decor: Choose a container that complements your kitchen’s style and color scheme.
- Footprint: Consider the counter space available. Slim, tall designs might fit better in tight spaces than wide, squat ones.
- Stability: A heavier container (like ceramic) is less likely to be accidentally knocked over than a lightweight plastic one.
Liner Compatibility and Usage
While not strictly a feature of the container itself, its compatibility with liners is an important consideration.
- Biodegradable/Compostable Bags: Many people prefer to use liners for easier emptying and to keep the container cleaner. Ensure the container is appropriately sized for standard compostable bags. Certified compostable bags (e.g., BPI certified) are designed to break down in composting environments.
- Newspaper/Paper Towels: For those avoiding plastic liners, placing a layer of newspaper or a paper towel at the bottom can absorb moisture and prevent scraps from sticking, making cleaning easier.
By carefully evaluating these features, you can select a kitchen food scrap container that not only meets your practical needs but also enhances your commitment to sustainable living and gardening.
Best Practices for Using Your Kitchen Food Scrap Container
Once you’ve selected the perfect kitchen food scrap container, implementing best practices for its use is crucial for maintaining hygiene, preventing odors, and ensuring an efficient transition of organic materials to your composting system. A well-managed container contributes significantly to a pleasant kitchen environment and a successful composting journey.
Optimal Placement in the Kitchen
The location of your food scrap container can significantly impact its convenience and effectiveness:
- Proximity to Prep Area: Place the container close to where you typically chop, peel, and prepare food. This minimizes drips and makes it easy to deposit scraps immediately, reducing clutter on your counters.
- Out of Direct Sunlight: Avoid placing the container in direct sunlight or near heat sources (like ovens or radiators). Heat accelerates decomposition, leading to quicker odor development and potential fruit fly issues. A cool, shaded spot is ideal.
- Accessible but Discreet: While it should be easy to reach, you might prefer to keep it slightly out of sight if aesthetics are a concern, perhaps on a less prominent counter corner or inside a cabinet (for under-sink models).
Emptying Frequency: The Key to Odor Control
The most effective way to prevent odors and discourage pests is to empty your container regularly:
- Daily or Every Other Day: For countertop bins, emptying daily or every other day is generally recommended, especially in warmer climates or if you generate a lot of moisture-rich scraps. This prevents significant decomposition from starting.
- As Needed: If you’re using a larger under-sink bin or storing scraps in the freezer, the frequency can be less, perhaps 2-3 times a week or when full. Frozen scraps can be stored for much longer without issue.
- Before Smells Emerge: Train yourself to empty the container before any noticeable odors develop, rather than waiting until it becomes unpleasant.
Cleaning and Maintenance Regime
Regular cleaning is non-negotiable for hygiene and odor prevention:
- Wash After Each Emptying: After emptying the scraps, rinse the container thoroughly with warm, soapy water. For deeper cleaning, especially for plastic bins, a scrub brush can be helpful.
- Sanitize Periodically: At least once a week, or more often if needed, sanitize the container. A solution of equal parts white vinegar and water, or a very dilute bleach solution, can be used. Ensure thorough rinsing afterward.
- Address Stubborn Odors: If a lingering odor persists, try scrubbing with baking soda paste, letting it sit for an hour, then rinsing. Alternatively, placing a slice of lemon or a few drops of essential oil (like tea tree or citrus) in the clean, empty bin for a short while can help.
- Filter Replacement: If your container has a charcoal filter, adhere to the manufacturer’s recommendations for replacement, typically every 2-6 months, or when odors start to become noticeable again.
Lining Options for Convenience and Cleanliness
Liners can simplify the process of emptying and cleaning:
- Certified Compostable Bags: These bags are designed to break down in a compost pile along with your food scraps. Look for certifications like BPI (Biodegradable Products Institute) in North America or EN 13432 in Europe to ensure they are truly compostable and won’t leave plastic residues. Ensure the bag size is appropriate for your container.
- Newspaper or Paper Bags: For those who prefer to avoid all forms of plastic, lining the bottom of the container with a few sheets of newspaper or using a brown paper bag can absorb moisture and prevent scraps from sticking. These are fully compostable.
- No Liner: Some prefer to use no liner at all, relying on regular cleaning. This works well with stainless steel or ceramic bins that are easy to wash.
Managing Odors and Pests
Even with best practices, occasional issues may arise:
- Fruit Flies: These tiny pests are attracted to ripening and fermenting fruit and vegetable scraps. Emptying frequently is the best defense. Keeping the lid tightly sealed, freezing scraps, or placing a small bowl of apple cider vinegar with a drop of dish soap near the bin can help trap them.
- Mold: A small amount of mold is natural during decomposition. However, excessive mold can indicate too much moisture or infrequent emptying. Ensure the container is not too wet, and consider adding a layer of newspaper at the bottom to absorb excess liquid.
- What to Do with Problematic Scraps: If you have items known to produce strong odors (e.g., onion peels, very ripe fruit), consider placing them directly into your outdoor compost bin immediately, freezing them until compost day, or burying them deeper in the compost pile.
By integrating these practices into your daily routine, your kitchen food scrap container will remain a clean, odor-free, and highly effective tool, consistently contributing to your sustainable gardening efforts.
Integrating Your Kitchen Container with Your Composting System
The kitchen food scrap container is the gateway, but its true purpose is realized when its contents are transferred to a larger composting system. This integration is where the magic happens, transforming kitchen waste into a valuable resource for your garden. Understanding how to bridge this gap efficiently ensures a continuous cycle of nourishment for your plants and a significant reduction in household waste.
Bridging the Gap: From Kitchen to Outdoor Composter
The act of transferring food scraps from your kitchen container to your outdoor compost pile, worm bin, or municipal collection system is a critical step. A smooth transition minimizes mess, maintains hygiene, and optimizes the composting process.
- Outdoor Compost Pile: This is the most common destination for garden-relevant food scraps.
- Layering: When adding kitchen scraps to a compost pile, it’s essential to layer them with “brown” materials (carbon-rich, such as dry leaves, wood chips, shredded paper, straw). This balances the nitrogen-rich “green” food scraps, helps with aeration, and prevents the pile from becoming too wet and smelly. A good ratio is typically two parts brown to one part green.
- Burying: To deter pests and prevent odors, it’s best practice to bury fresh kitchen scraps within the existing compost pile, covering them with at least 6-8 inches of brown material or finished compost.
- Chopping: Breaking down larger food scraps (e.g., watermelon rinds, whole fruit) into smaller pieces before adding them to the compost pile will significantly speed up decomposition.
- Worm Bin (Vermicomposting): For smaller-scale composting, particularly suited for apartment dwellers or those with limited outdoor space, a worm bin is an excellent option.
- Small Portions: Worms can only consume a certain amount of food at a time. Add kitchen scraps in small portions, spreading them across the surface or burying them in different sections of the bin.
- Avoid Overfeeding: Overfeeding can lead to anaerobic conditions, foul odors, and can harm the worms. If you notice uneaten food accumulating, reduce the feeding frequency or amount.
- Appropriate Scraps: While worms are efficient, they generally prefer fruit and vegetable scraps. Avoid large quantities of citrus, onions, spicy foods, and as always, meat, dairy, and oils.
- Municipal or Community Composting Programs: Many cities and towns offer curbside organic waste collection or have drop-off sites.
- Follow Guidelines: Always adhere strictly to the program’s specific guidelines regarding acceptable materials and container requirements (e.g., use of specific bags or bins).
- Convenience: These programs offer a convenient way to divert food scraps if you don’t have space for a home compost pile or prefer not to manage one.
Benefits of a Good Kitchen Container for the Composting Process
A well-chosen and properly managed kitchen food scrap container is not just about keeping your kitchen tidy; it directly enhances the overall composting process:
- Consistent Supply: It ensures a steady and convenient supply of “green” materials for your compost pile, making it easier to maintain the carbon-to-nitrogen balance.
- Pre-Sorting: By allowing for immediate segregation of acceptable and unacceptable items, it prevents contaminants from entering your compost, thereby improving its quality.
- Reduced Pest Attraction: A container with good odor control keeps pests away from your kitchen, and by emptying it regularly, you prevent a large accumulation of highly attractive material that might draw pests to your main compost pile.
- Motivational Tool: The visual presence of a dedicated food scrap container serves as a constant reminder and encourages consistent participation in food waste diversion, reinforcing sustainable habits.
Troubleshooting Common Issues During Transfer
- Messy Transfer: If using a liner-free container, carry it directly to the compost pile. Use a small hand trowel or spade to scoop out sticky contents if needed. If using a liner, ensure it’s robust enough to not tear during transport.
- Odor at the Composter: If your outdoor compost pile becomes smelly after adding kitchen scraps, it’s often a sign of too much “green” material or insufficient aeration. Add more “browns” and turn the pile to introduce oxygen.
- Pests at the Composter: Ensure fresh food scraps are always thoroughly buried within the compost pile, covered by at least 6-8 inches of other material. Avoid adding meat, dairy, or oily foods. Keep your compost pile contained (e.g., in a tumbler or a covered bin) if pests are a persistent problem.
By understanding and applying these integration strategies, your kitchen food scrap container becomes a powerful first step in a seamless, effective, and environmentally beneficial composting system, directly contributing to a healthier and more productive garden.
Environmental and Horticultural Benefits of Food Scrap Diversion
The seemingly small act of collecting food scraps in a kitchen container and diverting them from landfills yields a cascade of significant environmental and horticultural benefits. This practice embodies a practical approach to resource management, demonstrating how everyday actions can collectively contribute to a healthier planet and more vibrant gardens.
Reducing Landfill Waste and Greenhouse Gas Emissions
One of the most immediate and quantifiable benefits of food scrap diversion is the reduction in landfill waste. Food waste constitutes a substantial portion of municipal solid waste, and sending it to landfills creates several environmental problems. When organic matter decomposes in anaerobic (oxygen-deprived) landfill conditions, it produces methane (CH4), a potent greenhouse gas that is many times more effective at trapping heat than carbon dioxide (CO2) over a 20-year period. By composting food scraps, we:
- Mitigate Methane Emissions: Composting is an aerobic process, meaning it requires oxygen. Under aerobic conditions, organic matter decomposes primarily into carbon dioxide and water vapor, with minimal methane production. This significantly reduces the climate impact associated with food waste.
- Conserve Landfill Space: Diverting food scraps extends the lifespan of existing landfills, reducing the need for new landfill construction, which can be environmentally disruptive and costly.
- Reduce Resource Consumption: It lessens the demand for energy and resources associated with waste transportation and landfill management.
This simple act in the kitchen contributes directly to global efforts to combat climate change and preserve natural resources.
Enriching Garden Soil and Supporting Plant Health
For the gardener, the benefits of transforming food scraps into compost are profoundly impactful on soil quality and plant vitality:
- Nutrient Cycling: Food scraps are rich in macro- (nitrogen, phosphorus, potassium) and micro-nutrients (e.g., calcium, magnesium, iron) essential for plant growth. Composting returns these valuable nutrients to the soil in a stable, readily available form, reducing the reliance on synthetic fertilizers.
- Improved Soil Structure: Compost acts as a powerful soil conditioner. It aggregates soil particles, creating a crumbly structure that enhances aeration (allowing roots to breathe) and improves drainage in heavy clay soils, while increasing water retention in sandy soils. This dual action makes soil more resilient and easier to work with.
- Enhanced Water Retention: The sponge-like quality of humus (stable organic matter from compost) significantly increases the soil’s capacity to hold water. This means plants require less frequent watering, conserving precious water resources and reducing irrigation efforts, particularly beneficial in drought-prone regions.
- Microbial Biodiversity: Compost is teeming with beneficial microorganisms, fungi, and earthworms. These soil inhabitants play crucial roles in nutrient cycling, breaking down organic matter, improving soil structure, and suppressing plant diseases. A healthy microbial community translates to healthier, more vigorous plants.
- Disease and Pest Suppression: Robust soil microbial life, fostered by compost, can outcompete and suppress harmful soil-borne pathogens, leading to healthier plants that are more resistant to diseases. Similarly, stronger, healthier plants are often more resilient to pest attacks.
- Reduced Reliance on Chemical Fertilizers: By providing a continuous source of balanced nutrients, compost lessens or eliminates the need for chemical fertilizers, which can harm soil microbiology, leach into waterways, and contribute to pollution.
Educational Value and Community Impact
Beyond the tangible environmental and horticultural gains, the practice of collecting food scraps fosters a deeper understanding of food systems and waste cycles within households. It:
- Promotes Awareness: It makes individuals more aware of the amount of food they waste, often leading to more mindful consumption and reduced overall food waste.
- Engages Children: It provides a hands-on educational opportunity for children to learn about decomposition, nutrient cycles, and environmental responsibility.
- Fosters Community: In communities with composting initiatives, it strengthens bonds and encourages collective action towards sustainability goals.
In essence, the small step of integrating a kitchen food scrap container into daily life is a profound stride towards creating a more regenerative home and garden, contributing to a healthier local ecosystem and a more sustainable global environment.
Advanced Considerations and Tips for Food Scrap Management
Once the basic routine of collecting food scraps is established, there are several advanced considerations and tips that can further optimize the process, enhance efficiency, and overcome common challenges. These insights cater to diverse living situations and aim to deepen the commitment to sustainable food scrap management.
DIY Container Options for the Budget-Conscious
While commercially available containers offer convenience and specific features, a functional food scrap container can be created from items already around the house, saving money and further extending the life of existing materials.
- Repurposed Plastic Containers: A clean, empty ice cream tub, a large yogurt container, or a cereal keeper with a lid can serve as an effective interim scrap bin. Ensure the lid fits tightly to control odors.
- Old Pots or Bins: An old kitchen pot (especially stainless steel or ceramic) with a lid, or a small wastepaper basket lined with a compostable bag, can be adapted. For plastic bins, consider drilling a few small holes in the lid for very slight ventilation, which can help prevent anaerobic odors, but be mindful that this might allow more odors to escape.
- Mason Jars or Glass Jars: For very small quantities of scraps or for immediate freezer storage, a wide-mouth mason jar with a lid is an excellent, odor-proof, and easy-to-clean option.
The key for any DIY solution is to ensure it is easy to clean, has a secure lid, and is made of food-safe material.
Specific Considerations for Small Kitchens or Apartments
Space constraints in small kitchens or apartments often require more creative and compact solutions for food scrap management.
- Freezer Storage as Primary: For minimal counter space, designate a small container or a gallon-sized freezer bag in your freezer as the primary collection point. Scraps won’t decompose or smell, and it eliminates the need for a countertop bin. When full, simply take the frozen block to your outdoor compost or municipal drop-off.
- Under-Sink Pull-Out Systems: If installing new cabinetry, consider a built-in pull-out bin system. These maximize vertical space and keep the bin out of sight.
- Small Wall-Mounted Bins: Some compact bins are designed to be hung on the inside of a cabinet door, freeing up counter and floor space.
- Bokashi or Vermicomposting Indoors: For those without access to an outdoor compost pile, a small Bokashi system or a compact indoor worm bin can process scraps directly within the apartment, converting them into a soil amendment that can be used for houseplants or community gardens.
Seasonal Considerations for Food Scrap Collection
The management of food scraps can vary with the seasons, especially for those with outdoor compost piles.
- Winter: Decomposition slows significantly or stops entirely in freezing temperatures. You may need to store more scraps in the freezer or a cold garage/basement until warmer weather returns. Alternatively, layer them very deeply into an existing compost pile if you can still access it, ensuring they are well-covered to prevent attracting animals.
- Summer: Warmer temperatures accelerate decomposition, making it crucial to empty your kitchen container more frequently (daily is often best) to prevent odors and fruit flies. Ensure your outdoor compost pile is turned regularly and has a good balance of greens and browns to facilitate aerobic decomposition.
- Abundant Harvests: During periods of abundant garden harvests or bulk fruit/vegetable purchases, you might generate significantly more scraps. Plan accordingly by having larger storage options (e.g., a dedicated freezer bin) or by making more frequent trips to your main compost.
Encouraging Family Participation
Engaging all household members in food scrap collection ensures consistency and reinforces sustainable habits.
- Lead by Example: Be consistent in your own habits. People are more likely to participate if they see it being done regularly.
- Educate and Explain: Clearly explain why food scrap collection is important – for the garden, for the environment, for reducing waste. Explain what goes in and what stays out.
- Make it Easy: Ensure the container is accessible and easy to use. If it’s too complicated or out of the way, participation will drop.
- Assign Roles: For children, make it a fun chore. They can be responsible for emptying the small kitchen bin into the larger outdoor one, or for crushing eggshells.
- Visual Reminders: A small, clear sign near the container outlining acceptable items can be helpful for everyone.
By implementing these advanced tips, households can refine their food scrap management practices, making them even more efficient, adaptable, and a truly integral part of their sustainable lifestyle.
Conclusion: A Small Step Towards a Greener Garden and Home
The journey towards a more sustainable home and a thriving garden often begins with simple, intentional steps. Among these, the integration of a kitchen food scrap container stands out as a deceptively modest yet profoundly impactful action. Far from being a mere receptacle for waste, it represents the vital first link in a regenerative cycle, transforming potential landfill material into life-giving nourishment for our soil and plants.
Throughout this article, we’ve explored the multifaceted aspects of this essential kitchen tool: from understanding which organic materials are suitable for garden use to navigating the diverse array of container types available. We delved into the critical features to consider for selection, emphasizing the importance of size, material, and, crucially, effective odor control. Best practices for daily use, including optimal placement, emptying frequency, and diligent cleaning, were highlighted as indispensable for maintaining a hygienic and pleasant kitchen environment. Furthermore, we examined how to seamlessly integrate the kitchen container with various composting systems, ensuring that collected scraps efficiently transition into valuable garden amendments.
The benefits extend far beyond the confines of our kitchens and gardens. By diverting food scraps, we contribute significantly to reducing landfill waste and mitigating harmful greenhouse gas emissions, playing an active role in the fight against climate change. For the gardener, the transformation of these scraps into nutrient-rich compost directly enriches soil structure, enhances water retention, and fosters a vibrant ecosystem of beneficial microorganisms, ultimately leading to healthier, more resilient plants and a reduced reliance on chemical fertilizers. This practice not only nourishes our gardens but also cultivates a deeper understanding of ecological cycles and resource stewardship within our households.
Adopting a kitchen food scrap container is an accessible, low-barrier entry point into sustainable living. It requires minimal effort but yields substantial rewards, both for the environment and for the vitality of our green spaces. It empowers individuals to take a tangible step towards reducing their ecological footprint, fostering a mindful approach to consumption, and actively participating in the creation of a more sustainable future. Embrace this simple yet powerful tool; your garden, your home, and the planet will thank you.

